 |
| Bob and Charmayne's hints and tricks: sleeves |
#2: sleeves |
| Sleeves are an important
part of the kite. They keep the rods where they should be. Just like trying to get spars into pockets when you are on the flying field,
sometimes spars don't go into sleeves easily if they are too tight. Yet we
like to keep the sleeve narrow and fitting as close as possible. We also
don't like the rod to push out onto the face of the kite.
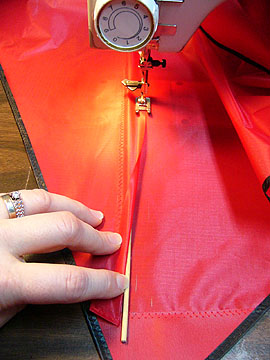
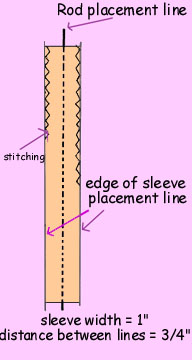
I make our sleeves so they are like little tunnels. They look neater than wide, flat sleeves, control the rods well, and are easy to slid the rod through. I always make a sample sleeve before working on the kite skin. Actually two: a scrap practice sleeve for measuring and a practice sleeve for a real trial. Make sure you are fitting the sleeve to the rod size you will be using and one with either an end cap or arrow nock on it. If the arrow nock won't go through the sleeve, you won't be happy! I mark a line on my practice scrap with a pencil where the center of the rod should be. I estimate how wide my strip will need to be by using the rod and another scrap of fabric. Remember you will need two seam allowances. Measure the width of this practice sleeve, write it down and then lay the practice sleeve aside. Divide the measurement in half. Subtract 1/8" or 2mm. Measure this distance from the pencil line you made earlier and run another line. Repeat on the other side of the center line. The second and third lines are the placement lines for the sides of the sleeve. The distance between the lines is narrower than your sleeve width so you get the "tunnel". See the diagram below. Pick up the practice sleeve again and sew the first side of the practice sleeve in place. To assist sewing the second side, I use a thin dowel slipped between the sleeve and the kite skin. See the picture below. My dowel is fairly short, about 10 inches or 25 cm long and I move it as I sew. Roll it over against the stitched side of the sleeve to help you line up the remaining side of the sleeve with the 3rd pencil line. Sew the other side of the sleeve and test this sample with your rod and end cap or nock. It may take you a trial or two but soon you should be able to get a good sleeve without too much effort. Re-measure the width of the practice scrap sleeve if your first try did not work. This may seem complicated until you do it the first time. It is harder to explain than it is to do! Measure the length you want the sleeve to be. (Note: you don't necessarily have to have the sleeve covering the entire rod to control the movement of the rod.) Cut your strip the proper length and the width you wrote down earlier. Sometime I hot cut my sleeves, sometimes not. If you make a lot of sleeves that are 1" wide, you can buy commercially made stripping. It is called "tail strip". If you want your sleeve an exact length and want to also do the next tip, add 1/2 inch to the length. The other thing I do on our sleeves is to turn under a few millimeters or about 1/4" of each end and stitch it. This makes the end of the sleeve a little stronger, neater, and easier to stab the rod into! You can just barely see it in my picture. The folded edge is always folded to the outside. Never the inside because as you push the rod out through the other end, the end cap or nock could catch on a turned under flap. Extra hint: remember that sample sleeve you made? Save it, along with the patterns for any reinforcements you made. Mark them as to what kite they are for and any information that might be helpful (such as dimensions of the sleeve strip and stitching setback). You are ahead of the game if you make this kite again. |
|
|