
Cutting a single layer of tail. |
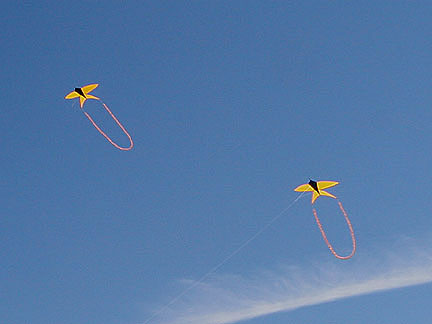 Fuzzy tails add stability and beauty. |
| Bob and Charmayne's hints and tricks |
#5: Fuzzy Tails |
| Sometimes you need a tail
to stabilize a kite. You need a tail with a lot of drag. This would be a fuzzy tail!
We use two different styles. This tutorial explains one of them. Start with a long strip of 3/4 ounce rip stop nylon about 5 cm or 2" wide. It can be wider, even a lot wider. I cut the width of the fabric and cut multiple strips to get the length I need. You do not need to pre-sew the strips together. I will overlap strips about 1 cm (or about 1/2 ") when I add the line in the center (see below). Fold over the end of the first strip about 1 cm ( or about 1/2 ") inch. I fold again to add extra strength. Stitch across the end with a straight or zig zag stitch. Decide if you will ever want to have this tail be a looped tail. If you think you will, you will need an extra 20 -25 cm or 8 to 10 inches of line at each end of the tail. If you will never want it looped, just leave extra line at one end. Position a line (like your flying line) at the start of your first strip in the center, running down the length. Remember to leave the extra line before the start of the strip. I use a narrow width, long stitch length zigzag. You want to make sure the needle is penetrating the line most of the time. A cording foot may help you. What size line? What test? Whatever you have on hand than you can sew easily. You don't need heavy line, just something easy to sew over. Close to the end of the first strip, add in the second overlapping slightly. Continue adding strips until your tail is long enough. Near the end of the final strip, turn over a double hem again as you did at the start. For a looped tail, leave the line extending past the hem. No looping needed? Hot cut the line even with the hem edge. After sewing, tie a loop in the end(s) of the line. We usually Lark's head this loop to the kite so it should be a big enough loop to maneuver. Now to make the tail fuzzy... Cut the ripstop nylon from near the sewn line, perpendicular through the edge, down both sides. BIG HINT: Do not cut through the line!!! Here are 2 secrets for making the cutting go fast... I use a snap knife, a piece of glass for the cutting surface (better than a green mat in this case), and heavy weights to help secure the tail while cutting. Slice every 1 to 2 centimeters (3/8" to 3/4" inch). Don't worry about getting your spacing perfect. I just slice as fast as I can and get it over with! Some people will suggest a small pair of scissors. After my hand cramped part way through our first fuzzy tail, Bob figured out a snap knife with a sharp blade works so much better. If you take a bit of care, you will find it is no problem to avoid the line. I put the point of the knife a smidge away from the line and drag it towards me, holding a bit of downward pressure on the tail with my free hand. BIG HINT: Do not cut through the line!!! After you have done a few tails or at least are comfortable with the snap knife method of cutting, try this second time saving trick... Fold the tail lengthwise on the line. Secure sections of the tail with heavy weights. Slice the section, move the weights, repeat and finish twice as fast! You are cutting both sides of the tail at once with the same technique you used for a single layer. BIG HINT: Do not cut through the line!!! What if you cut the line? Add a short piece of line across the cut section to reinforce your tail at that point. Use the loops at the end of the tail to attach it to your kite. Sometimes I add a short line with knot onto the kite and lark's head the tail to that. You can also lark's head the loop around a spar. |
|
Cutting a single layer of tail. |
Fuzzy tails add stability and beauty. |