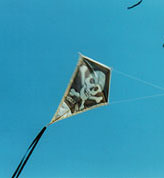
| We start these replica kites by finding a picture of an
old Hi-Flier kite or by using an actual kite. Pictures must be straight
on, reasonably clear, fairly large, and, of course, the complete picture.
Sometimes we are lucky enough to find a nice shot of the entire kite plus
several close-ups. We save them all. The close-ups are good for reference.
If we start with the actual kite, we use a digital camera and shoot the
picture straight down from up above the kite. Close-ups aren't necessary
as we have the kite itself for reference. Into the computer the picture
goes. The next step is to clean up the picture using a paint program such as Adobe PhotoDeluxe or Paint Shop Pro. Eventually the picture becomes a black and white line drawing. Bob usually does this work. It requires patience and many hours. |
 |
|
| We print the drawing onto a transparency. Next step is to enlarge the pattern to full size. We tape paper or fabric on a wall in our garage. You need a large blank, smooth wall. The garage works for us and also is fairly dark even in the daytime. We have used paper for this step as well as the ripstop nylon fabric which will be the actual kite. Drawing directly onto the fabric saves the expense of the paper and the time of transferring the design twice. Drawing onto paper allows you to clean up the tracing. This is important if your wall has any texturing on it! Plus you can reverse it onto the fabric if you forgot to check the orientation. We have a full sized template of the finished kite for our guide when positioning the design and getting it to be the right size. I trim excess paper so it is easier to handle. |
 |
|
 |
||
| Transfering the drawing to the fabric is the next step. I do this by taping both the paper and the fabric to our sliding glass door and use a pencil which I know can be erased. I trace the design in reverse onto the fabric. I want the pencil to be on the outside of my "layer sandwich" so it must be reversed. |
 |
 |
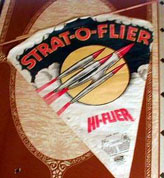
| Next comes the layering of the fabric colors, the sewing,
and the back cutting. I use a pretty standard reverse appliqué method.
See Charmayne. See Charmayne sew. See Charmayne sew and sew and sew. A quick appliqué project can take 4 hours. The appliqué for Strat-O-Flier took a couple of days from start to "ready for reinforcements". Some take weeks. This process may be long but is not actually hard. I listen to a lot of audio books! Read this article for my appliqué method and tips. |
 |
 |
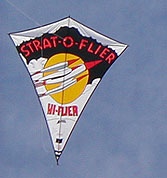
| Now you see the skin cut to size and shape, ready for
reinforcements, loops, pockets, sleeves, and whatever it will take to get
it ready for the rods and bridles. I tape it to the window to make sure my
back cutting is good and complete. Bob takes over and will size, cut, and glue the rods, add the bridle lines and give it a test fly in our driveway. Then it's off to the beach......! |
 |
 |